Custom Search


Although much of the information on this page isn't strictly autocross specific, it's still very useful for an autocrosser - chances are good you are doing most, if not all, of the work on your car, so you'll need some tools. And while I strongly recommend buying parts from the Corvair vendors, I have listed part numbers for some common items in case you need them the day before an event.
First of all, if it's broken, best to fix it before you get there. Don't carry around tools and parts because something is wrong and you haven't had time to repair it. Fix it where you have all your tools and supplies available if at all possible. However, at an event, or on a long trip you should have some basic tools with you for minor adjustments and in case something lets go, or breaks on a friend's car. I've also found a compact tool kit very useful for junkyarding where you don't want to lug a full size box.
For tools I strongly recommend buying good tools. Having a tool break in the middle of a job is irritating at least, and good tools won't slip off the fasteners as easily. There is great debate as to which tools are best, and certainly if you have the budget buying Snap-On or Mac is the way to go. Like most of us I don't have that sort of budget, so generally I buy Craftsman - they hold up well and you can get a replacement if one should break just about anywhere in the U.S. Whatever brand you pick, make sure you get a lifetime warranty, and don't buy junk.
As you might imagine, this sort of thing has more than one solution, so I have a couple tool lists here to give you some ideas:
Bob Marlow writes:
After my post about carrying a spare axle and bearing assembly and the related tools, several persons asked me to post the contents of my "on the road" tool kit for Corvairs. Please note, this is not a list of essential tools for performing Corvair work at home or in the shop; rather, it is my recommendations for a tool kit that is as small as possible while enabling you to perform virtually any Corvair repair (short of catastrophic driveline failure) at the roadside.
Smitty Says:
Onward and upward, never say die. It is amazing how the Corvair can get you there against all odds if one shows just a little ingenuity. Tain't gonna happen with a new car. Several years ago as I was pulling into a camp ground with the camper on the back of the wagon a guy in a pickup was pulling out. He rolled down the window and said, either you are the best mechanic in the world or the most crazy S** Of A B***h in the world. That's the way it should be for all of us. Our badge of honor. If you leave home with it, then come back with it running.
You may need some spares if something lets go at the event. Some of that depends on what sort of event you're running - if it's an autocross there isn't much you can fix between runs, but a track day or race allows for at least some amount of repair time.
Certainly a fan belt is prudent, and some extra carb linkage clips, wire ties, tape, extra fluids - that sort of thing can help if you just need to keep it together long enough to get in another run. I'd suggest a portable air compressor in case you discover a slow leak, and a torque wrench, extension, and socket if you need to swap tires. Finally, little cans of penetrant, carb cleaner, and brake cleaner to clean the car with, plus a couple shop rags and a tube of hand cleaner for you.
For a one day track event start with the above, additionally I'd go with some of the easy to replace stuff like an alternator, fuel pump, clutch cable, etc. (some folks carry this sort of thing on long trips, so review those suggestions below). A complete spare axle for earlies, or ready to go hub, halfshaft, and diff yokes for lates is smart too. There's a Tech Guide tip on modifying a late hub to fit on either side, yours should be set up that way. Front hubs rarely fail, but they do at least fit on either side without modification if you want to carry one.
At a weekend race the limit is really your budget and manpower. A spare powerpack (engine, diff, trans) might not be out of line. This list could be really tough, as it depends both on your budget and crew. Perhaps as much of a long block as you can manage, ditto for a transaxle.
- Checking Top Dead Center. I made a checker by knocking the ceramic insulation out of a spark plug and threading a 3/8-16 stud into it. Leave about 1 inch sticking out. Insert in no. 1 spark plug hole. Turn engine one way till it stops and mark the harmonic balancer referencing a point on the rear housing such as the zero timing reference mark. Turn the other way until it stops and mark the harmonic balancer at the same ref. point. Bisect the two marks and that is TDC.
NOW. What is interesting that this engine has a new harmonic balancer which hasn't slipped (inner vs outer) has the groove marked five degrees off TDC. This of course, throws off the timing adjustment/setting using a light. Mark a new line and time from it.
- Fran Schmidt told me first about using water to temporarily seal a vacuum leak and allow the engine to smooth out. The "opposite" way is to use a flammable fluid along the vacuum leak, let it get sucked in and the engine runs faster. Well, most of the flammables are REALLY flammable (Seth, inflammable to you). The solution is propane. Take a hand held-propane bottle (not the kind you use for your outdoor grill...) valve, pipe/tubing adapters to a push-button valve like an air hose gun, then a hose adapter to 3' of tygon tubing to a nozzle preferably plastic or nylon. Use this along suspected vacuum leak sites until the propane is sucked in and it speeds up. I think SNAP-ON sells this set-up for a gazillion dollars.
- Use the hollow spark plug by threading the outside-the-head side of the plug with a pipe thread to tubing adapter. This can be used with compressed air to hold valves up while you change springs, etc. You can listen for air escaping past valves, etc.
- Lastly, a large tapered punch clamped in a vise vertically makes a great carb holder so you can work on it (the carb, not the punch!!)
 Following some posts on VV about the super two in one cylinder head nut tool that Snap On and Mac (and maybe others) made for Corvairs, I recalled there was a description in the CORSA Tech Guide for making your own. I've also read a few other tips regarding sockets to use on the head nuts, so I combined all of the info I had together.
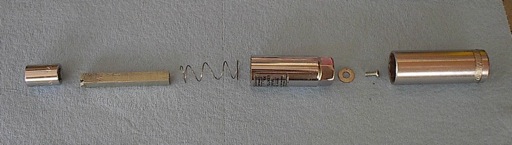
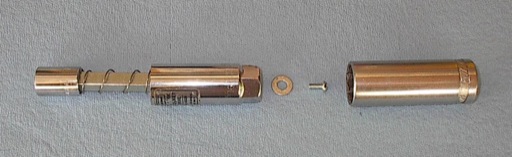 Basically, the tool is two sockets that can nest inside one another, with a 3" piece of 3/8" square stock and a spring joining them. That way driving one turns both, and the spring automatically extends the inner socket for you. For the sockets, I used a 14mm, which gives a snug fit on the top 9/16" nuts, and a 13/16" spark plug socket for the rocker studs. On the 13/16 socket, I filed the chamfer off since the hex on the rocker stud is so short. The 3/8" stock is retained in the 14mm socket by slightly mushrooming the end, the other end has a 8-32 screw and washer.
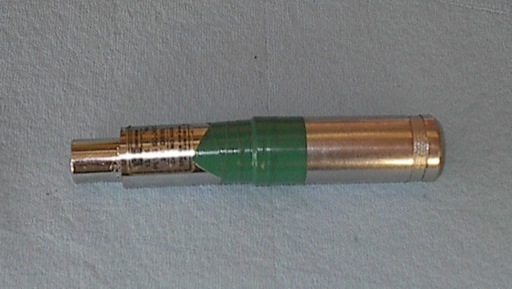 Once assembled, I taped a 7/8" socket on the drive hex at the end of the spark plug socket to drive the whole shebang. There's just enough room under the intake for the tool to fit, and with the tight 14mm socket it helped to spray the outside of the upper nuts with WD-40 so the socket would slip on with the light spring pressure (a stiff spring would make the tool tough to use). A few photos are here if you want to make one yourself. It does make things a lot easier, especially if you are torquing a head on an installed engine.
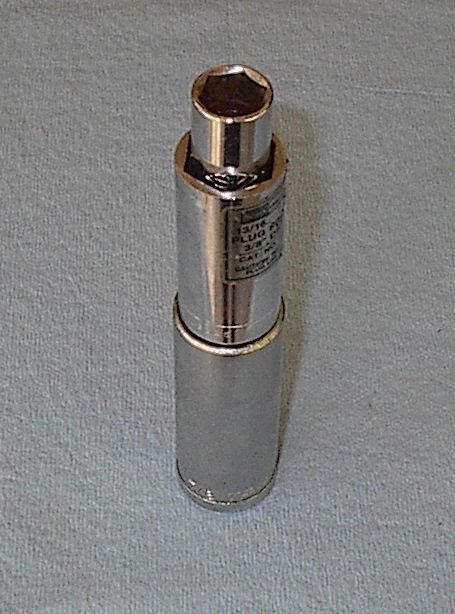 Note removal of the chamfer on the spark plug socket. A good idea even if not making the entire tool.
The oil pressure switch for the warning light has an eight sided edge, not a hex, and to change it you should use a special socket - not pliers! While you can get a generic socket from the auto parts store that will remove and install the switch without breaking it, Kent-Moore made a "J" tool that fits our cars without removing the alternator or fuel lines. Mac Tools made one as well, it seems to be a pretty close copy of the K-M tool, I have one and checked the fit on a friend's '63. Sure enough, just take the wire off and you can sneak it in there. The K-M tool is J-21757 (thanks to Joel McGregor for the number) and the Mac version is SC40, but be aware there are later versions that are taller, you want the one that the main body is about the same height as the width.
Smitty Says:
For a lot of people balancing brings up visions of gram weight scales and exotic machinery. I have been doing it for years the same way. I have never known how many grams I have removed or what final weights are, and I don't care, but I will put my balance jobs up against anyone. I do it with a length of piano wire clamped in a vise so that it sticks out parallel over the work bench. A section of headliner stay works well. I stand a piece of 2x4 about a foot long beside and near the end of the wire. I fix a hook on the end of the wire. Then I hold a rod in a horizontal position with the big end hanging on the hook at the cap parting line, and then find a block to rest the small end on to keep it horizontal with the big end hanging from the wire. Next I make a series of index marks on the long block where the piano wire is next to it about 1/8" apart. I mark the nearest mark as zero and put numbers on the marks above and below that. I don't care if this turns out to be the heaviest or lightest rod of the bunch. It is only providing a reference to set the tool up. For a street engine I balance opposing rods together. If one tries to get 6 of them the same weight he has his work cut out for him and sometimes can't be done with one set.Next I balance them for total weight which always upsets the big end weight a little. You can take this as far as you want to. A variation of this is used to balance pistons. The key to this is repeatability of how and where you hang the component. Each must be hung exactly the same way. It always throws me when someone asks how much difference do I find in rods. Oh, about three marks. ggg
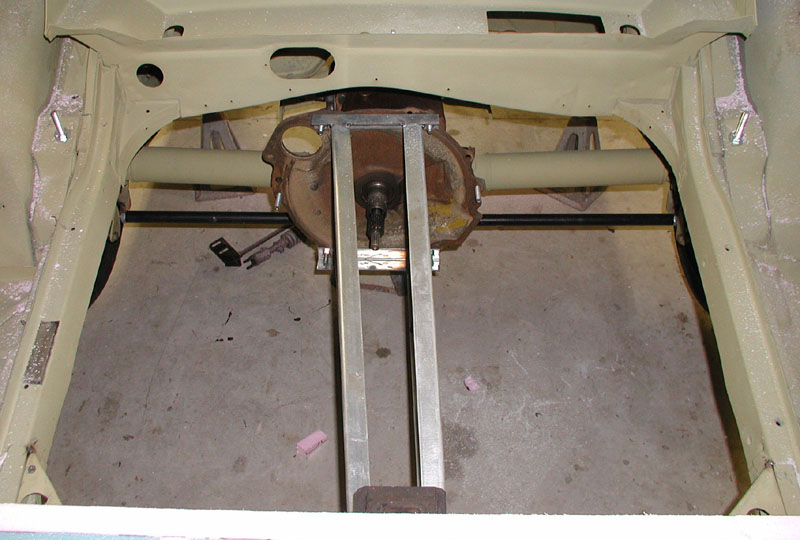
Sometimes you need to move a car around that doesn't have an engine. Since the transaxle is held up by the engine, it's easier if you have something to take its place, especially on a late model. Mel Francis made this neat bracket for the purpose.
Before you pull the engine, measure the distance between the top of the transaxle at the bellhousing flange and the body sheet metal. Once the engine assembly is out, jack up the differential to the same height. Bolt two sections of the angle stock to the differential at the top and bottom, using the existing bellhousing holes. Bolt a 6" section of angle stock to the rear mount, using both bolts. If you'd like some additional dimensions, I can supply them, but as you can see, the dimensions are mostly 'to fit' your own car.
Then weld the span sections to fit between these fixed ponts and voila!, you have a solid replacement bracket, which keeps everything aligned correctly and allows the car to be moved or transported easily, during any deep engine-servicing periods. This would also help during a long stay at a restoration shop, while you work on the engine at home.
If you'd like to shop for tools from the comfort of your home, Amazon has added an online tool store:
Here are some part numbers for common wear items - you may find that your local parts store doesn't have Corvairs listed in their computer. If you find yourself somewhere that can't get one of these, the dimensions for the belt are 3/8" by 56" - just be warned that a regular belt might not last at high RPMs, but it will get you home.
Smitty says:
The belt #15560 or 15565 is a National standard number. You will find the number on some belts with a letter added or some other thing to make them proprietary to that company. Some times you will find a totally different number for a company part number and then find the National numbers down in the corner of the wrapper (or not at all). I used to know what the first two numbers meant. I believe they identified the degree of the cut once but I am not sure. The third, forth. and fifth numbers stand for the length in inches. That would make the two a 56.0 inch belt or a 56.5 inch belt. The 56 inch belt is called for in most belt lists at your local store. That belt usually requires the aid of a screwdriver to put it on and the idler will ride very close to the shroud. The 56.5 inch belt is a comfortable fit and puts the idler in what I think is a ideal position. I learned about the numbers in the 50s so forgive my memory lapse on the first two in the series.
From Mike Ioanes on VV:
The "15" or "17" refer to 32nds of an inch (width). Many other belt manufacturers use the same or similar numbering systems i.e. Goodyear, Gates, etc. Napa's #s are totally foreign. Autozone sells Kelly Springfield belts, which use the same kind of #s. I've sold a lot of belts over the years.
I'll add that those first two numbers are probably a nominal size, much like a 2x4 piece of lumber. A Corvair belt is supposed to be about 3/8" wide, which would only be 12/32.