
Custom Search


The Corvair turbocharged engines are very much like their normally aspirated bretheren, but like most other turbo engines, they require some special care and feeding. Here are some selected tips and tricks to make your turbo Corvair work a little better. Remember that the stock system was designed to be simple and robust, you can gain some performance over stock but you will need a little more maintenance to keep it happy.
First a few key things to bear in mind, especially if you are building a hotter than stock turbo engine. See the rest of the page for further details.
There were two basic stock Corvair turbocharger designs, early and late, both made by TRW. The early turbo spools up faster, but has more restricion on the exhaust side than the late units. Combining an early exhaust with the late compressor will gain you better response from a stock appearing unit. If you're running in Prepared, you can use one turbo of any type. Of course if you are building a car that isn't constrained by rules, there are a number of newer turbo designs that are worth investigating. Turbo selection is too large a topic to cover here, check out the turbo book for more info.
The turbocharged engines are probably the most sensitive of Corvair engines to ignition system condition. Early Spyders used a special coil to deliver a hotter spark, later on a revised hot coil was made standard for all Corvairs. If you are using a standard points ignition, it must be in perfect condition to fire the engine under boost. Once you have the stock system working acceptably well, there are a few items which can improve the driveability and performance:
However, you don't really want the advance engaged when the engine is idling, so ideally you must devise a way of shutting off the vacuum when the engine is at idle. Ray Sedman makes such a device, or you can fabricate one with a microswitch and electric vacuum advance solenoid.
If you do this, block off the turbo pressure connection, and use the above mentioned microswitch setup to turn off the vacuum at idle. Another solution is to find a Carter YH from a 50's era car that used them (e.g. very early Corvettes) and use the ported vacuum port on the carburetor. Most of the adapted carbs below will also have a ported vacuum port available.
I believe there is now a turbo specific Safeguard model which can handle vacuum advance. Contact Ray Sedman for specifics.
Keeping a cool supply of oil to any engine is crucial, and the Corvair turbos present one of the biggest challenges. Today's oils are much better at withstanding heat, the synthetics are the best of the bunch. Even so, for an engine that will be run extensively under boost, you should consider an extra oil cooler. The installation that cools the best mounts the cooler in the nose where the license plate is normally, but for a street car it may be more practical to put one on the engine firewall where cooling air can pass over it before entering the engine. If you do this, you can easily add a line from the "cool" side of the cooler to feed oil to the turbo, instead of the stock line which feeds hot oil. Bruce Schug has such an installation of a Mazda oil cooler, take a look at it here.
Even a relatively stock engine should have attention paid to the oil cooler, see this page for info maximizing the oil cooling of the stock system.
Here's what worked for me. What is happening to make the engine cut out is not starvation but flooding from raw fuel being poured down the carb throat by the bowl vent when lateral forces slosh the fuel in the bowl (or drop the float down so uncontrolled fuel pours into the bowl).On the left end of the carb on top there is a chrome plated plug about 5/16 diameter. Pull that plug out. Inside you wil see a port running down and to the right which is the bowl vent. Running off of that port is one running down and to the left which dumps into the horn (mouth) of the carb. Get a piece of 1/4 ID tubing about 6" long. Push it into the bowl vent port at least far enough to go past the port going to the horn. Then bend the tube straight up. As I have explained to others, there is a possibility of fuel fountaining up out of this new vent if the float is displaced and can't shut the valve off. I have never known it if it did happen. If you are worried about it put a hose on it and leave it stick out the bottom of the car. Generally speaking, if it is just fuel slosh, it is going to have a hard time sloshing to the top of a 6" tube.
The other fix comes from Steve Goodman, with photos and extra details courtesy of Rich Shepard. This method is similar to the one above but would avoid any problem with fuel slosh out the vent that Smitty mentions.
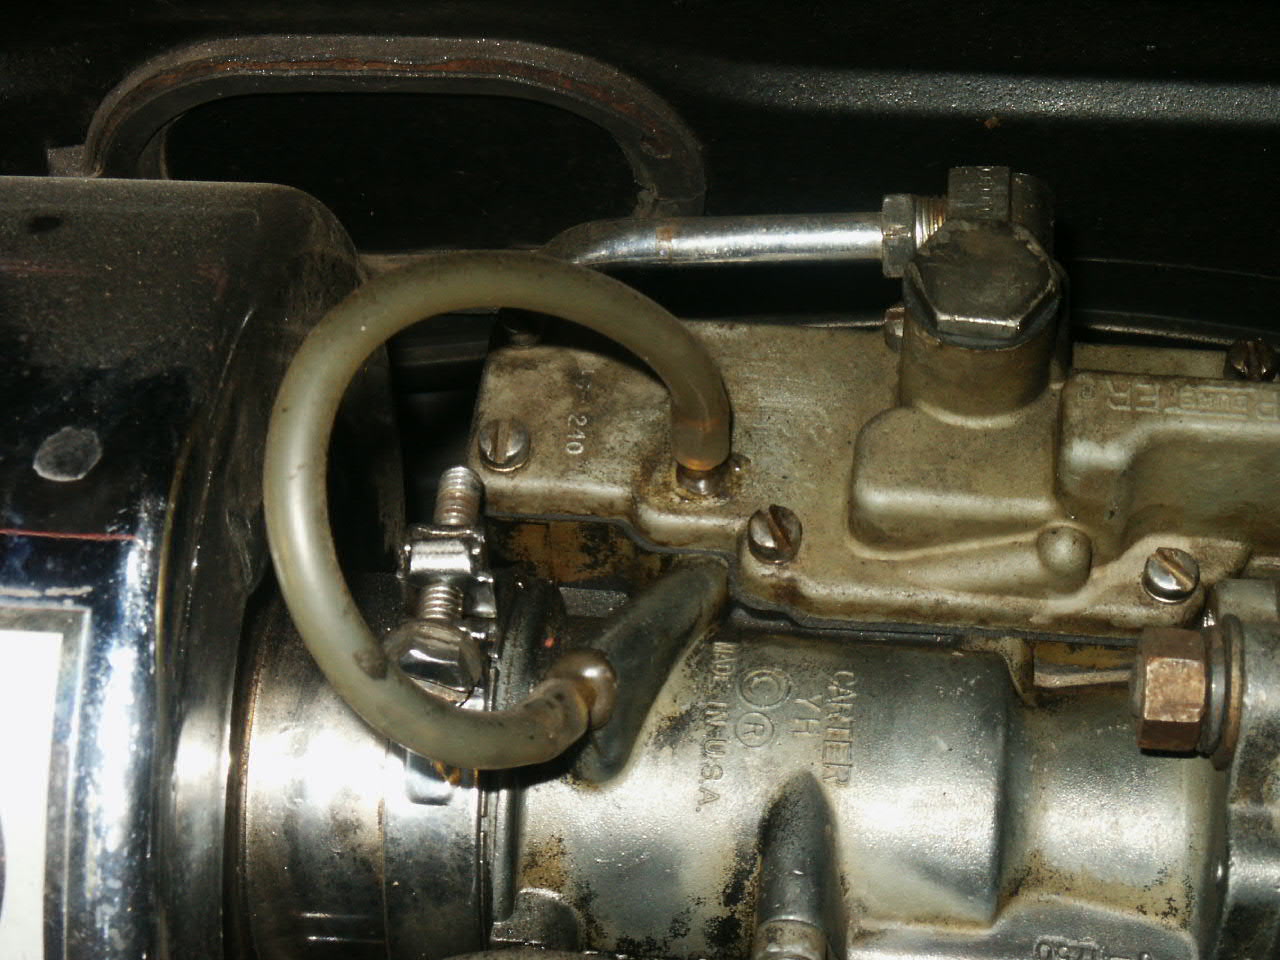
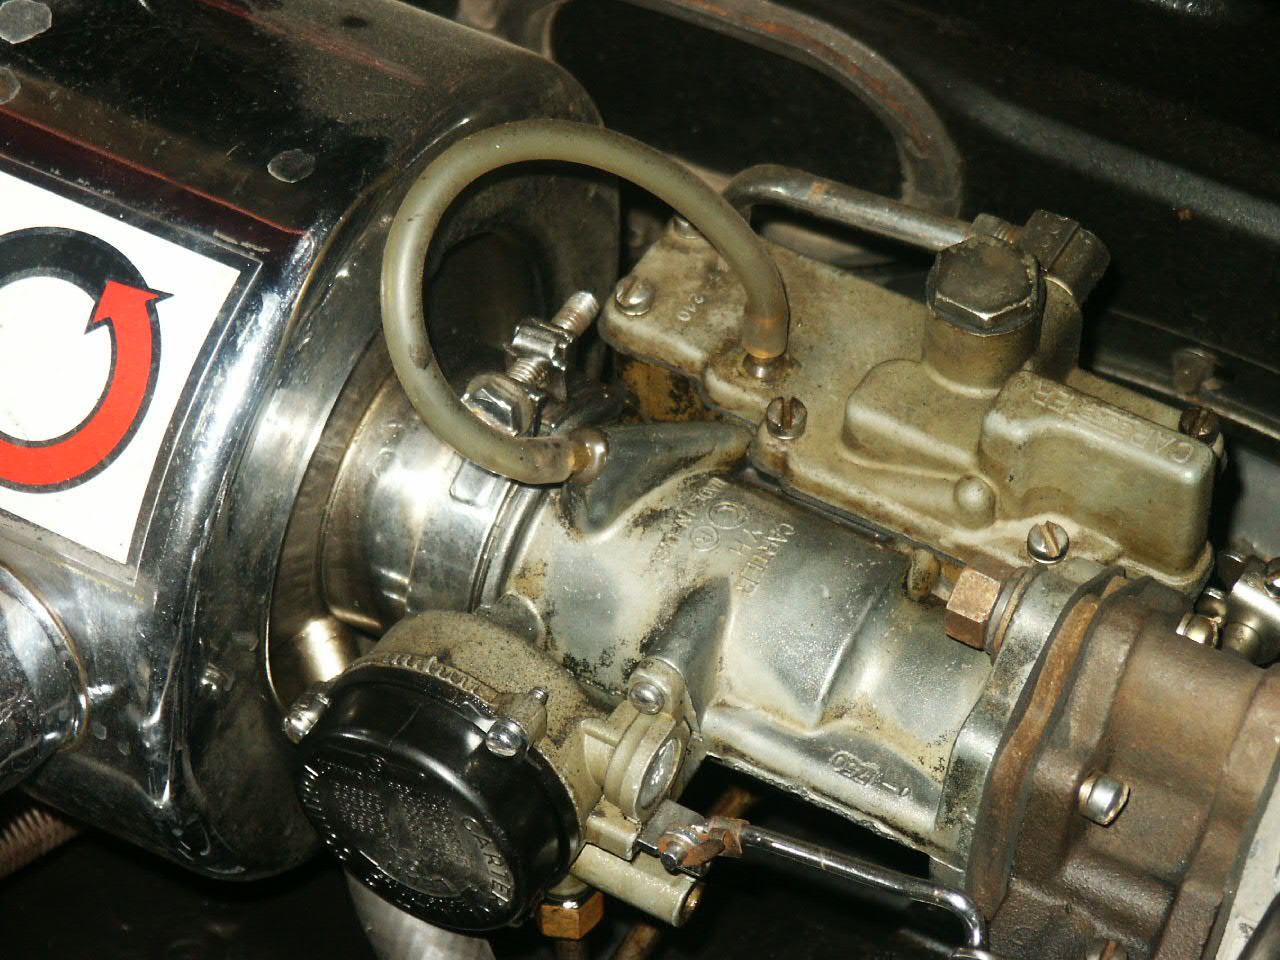
There is a simple fix for the flooding in right hand corners. It is a tube between the carb top and the plug on the carb body that feeds the tube into the air horn. You need to plug the carb body below where you slide the tube into the hole. Make a tall 'loop' with a piece of rubber tubing between the two parts and thus the fuel can't climb that loop.
First step is remove the fuel bowl top and set aside. Take out the plug on top of the inlet and look down it, you can see right into fuel bowl and floats. Plug that passage to the float chamber, and epoxy a fitting to the opening.
Next drill the float bowl top and epoxy a length of tubing. Be careful not to go too far into fuel bowl you want it to be above the fuel. Then add a piece of hose between the two fittings you install, as shown. Just make sure it is about 2-3 inches above carb top and is fuel proof, I used model airplane fuel line because I had it and it has lasted 3 years now with many laps around PIR at last years convention.
| Click on an image to see the full size version. | |
|---|---|
 |
 |
| Images courtesy Rich Shepard. | |
One thing to notice is that the side draft carbs have much better clearance - it might help to use a remote air filter with the downdrafts. In general, you want to be able to increase the venturi area with increased boost, so some sort of demand sensitive carb will work best. Be very careful not to let the engine run lean, this can quickly translate into burned pistons. Possible choices include (Click the photos to see the full size version):
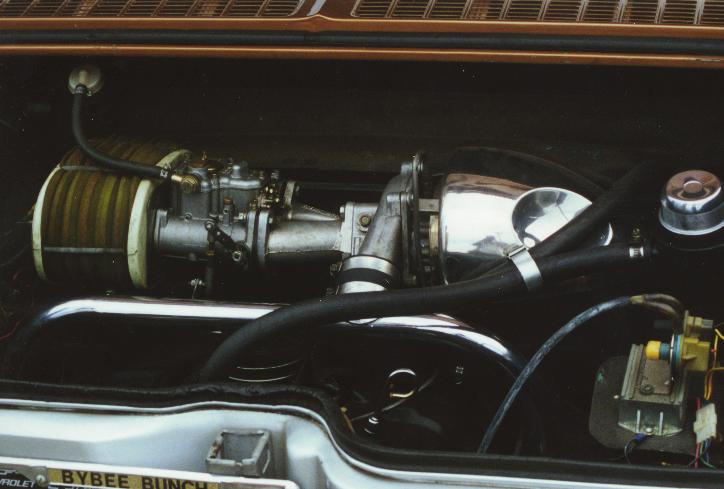
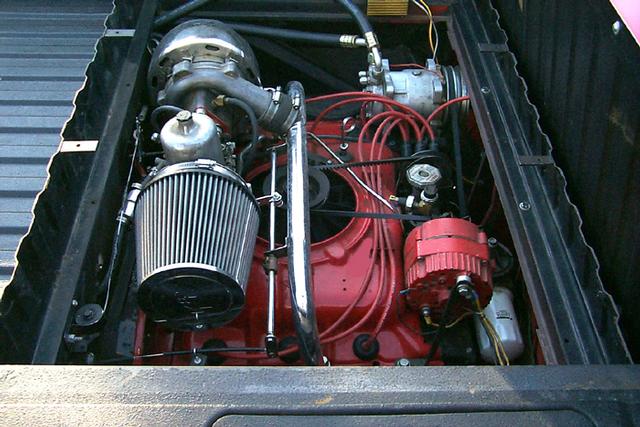
This one is on Fred Bybee's Corsa, note the two hoses, they lead to a puke tank topped with the chrome breather. On the lower right of the photo is the water injection unit.
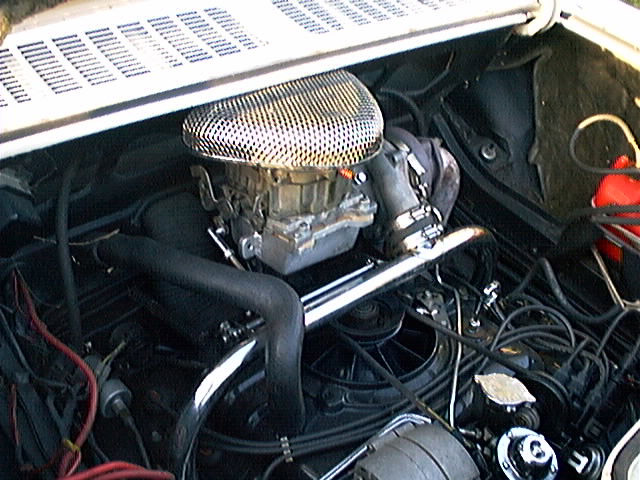
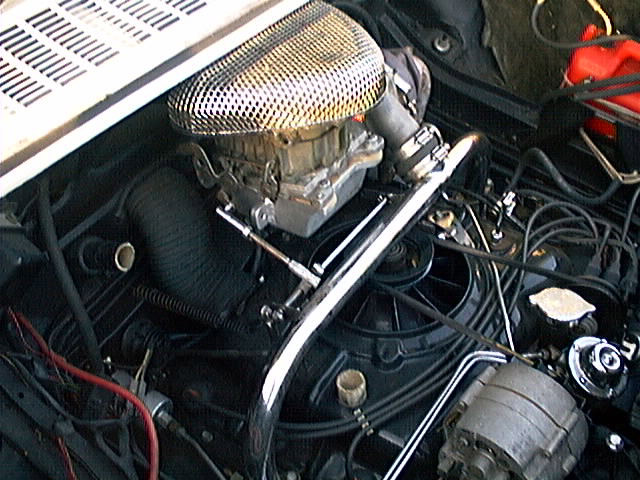
This setup is in Russ Thuleen's Rampside. Note it also has A/C.
 |
 |
 Rear view. |
 From the left quarter. Notice the large vent hose and the water injection tank in the right quarter. |
 Again from the left, with the hose removed. |
This photo and text is from Ron Blachut:
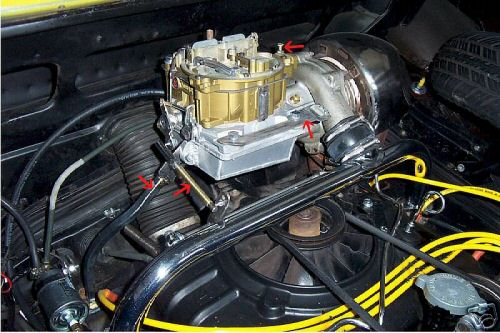
The arrows point to, clockwise from top, boost limit, manual choke cable clamp/mount, linkage, and manifold support.
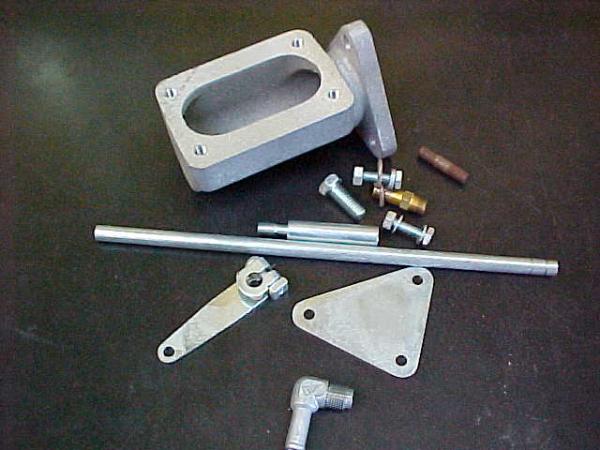 What comes in the box. |
 An installed kit. This particular one uses a Stromberg carb. |
Like most other carb setups, you have to be careful about size versus response, which is magnified by the fact that the engine effectively has a variable displacement with the turbo - at 15 psi you have doubled the airflow requirement. Since you can't run a wastegate in SP, use the carb size to limit boost. Given all of this, the Quadrajet has a lot going for it, it has small primaries and vacuum actuated doors so the secondaries don't see any airflow until called upon, and you can limit the opening of these doors to adjust the boost. In any case, you can use the carb opening as your boost control - get a good boost gauge, the stock one is not at all accurate. Take a passenger with you and run the car up a long grade on the highway to get a good reading of your peak boost. Obviously, it's best to start low and work your way up in boost. Check the plugs after each run to see if the engine is running lean.
The one thing to avoid with the exhaust is an increase in exhaust system volume upstream of the turbo. If the volume is greater, it will take longer for the exhaust to fill that volume to the same pressure, leading to more turbo lag. What this means, roughly, is don't use 140 exhaust logs, even on a 140 based turbo engine. Instead, keep things the same size as stock, and keep the heat in as much as possible. Wrapping the exhaust pipes will help for competition, but the pipes will not last anywhere near as long if you drive the car on the street.
Downstream from the turbo is simple enough, keep it as free flowing as possible. The stock muffler is fairly good, some of the aftermarket units will flow a little better. Remember that all of these parts get even hotter than on a normally aspirated engine, so take care with clearances and materials.
A blow through system offers several potential advantages over the stock setup, and quite a few have been built over the years. I've collected some notes from several builders, plus you can check out the excellent article by Gary Aube on Dave Binnie's car.
From Steve Goodman:
I decided I would write a bit about my experiences with pressurizing Rochester carbs. I did my first system in 1973 mostly because the turbo books said it couldn't be done or at least easily. I did very similar to the Bill Thomas arrangement only used rubber radiator hose with moulded 90 degree bends and a PVC T fitting from the turbo outlet. I tapped the top vent hole on the stock fuel pump for a hose barb to the t-fitting to reference pressure against the top of the fuel pump. I used an electric pump to feed the mechanical pump. After trying turbo and 140 distributors I settled on a 1110310 because it took the least amount of work on my distributor machine to make it work. I also used a vacuum advance NOT a retard unit. I didn't jet the carbs oversize but about 2 numbers (.054 as I recall). On the carb shafts I counterbored the base and let the o-ring settle into that bore with the springloaded washer pushing against it, the same that I do today for Underground's carbs. I removed the choke shafts and plugged the holes, don't need chokes anyway if your accel pumps work good. Lastly after trying to unsolder the floats and resolder with styrofoam etc inside I used the spray insulation to fill the floats although I blew up lots of floats experimenting with how little the shot of foam needed to be.
I really don't know whether the floats would implode or not. I had a customer tell me one time that he blew into 4 carbs and named some ungodly psi that he claimed he could get at 2000rpm and when I asked him about his floats he said they were stock, never touched them. Not sure whether he was funnin' me or not.
Boost was good, around 6 psi and fuel milage was ok also. The boost would actually hang on when shifting and the waiting time (lag) to re-spool the turbo wasn't necessary if the engine was turning up in rpm. I played with water injection, using a hobbs switch set at 2 psi to turn on a windshield washer pump. I fixed a piece of hose that I could change jets in easily and I made jets from old Rochester jets that I soldered closed and then re-drilled. The final size was in the .015 range. I was lost on how to make the water come out of the nozzle inside the carb in a spray or mist and finally used a piece of screen wire at an angle to help break up the shot from the nozzle.
I might add that I even tried raw gasoline instead of water being shot into the carb to help richen the mixture. DISCLAIMER: DO NOT TRY THIS AT HOME
The system that I describe above went to a customer in 1980 or so and he is still using it today.
The present system that I have on my 912 is barely refined from that early system. I still get 6-8 psi of boost (12-16in) The short geared 5 speed doesn't allow the loading of the turbo for as long a time as a longer geared 4 speed would. Frankly it is not as satisfying to drive as I had hoped, I think I need more engine size. Speed is ok but not a barn burner although the refined handling of the 901 series car makes up for a lot of it in the mountains.
When I did the first system the availability of air to air intercoolers was pretty nil. Remember I did the first system before the 930 turbo was on the road. Since the intercooler takes so much space in the engine bays and the areas are already pretty busy in the CORVAIR as well as my early 912, I have resisted using any kind of an intercooler. I don't want a whale tail on the 912 either. I also didn't want to use FI on the 912 engine and also didn't want all the electronic gadgets that make for more wiring and more things to change or keep track of their workings. I wanted a simple turbo system that is different that the stock unit and yes it does work better too. I was pleased that Dave Binnie took my simple stuff several steps beyond in his car, it shows what can be done when you go beyond simple...
I have always thought of my turbo unit as an _equalizer_. I don't want some humongous boost number that is guaranteed to blow the heads off the cylinders or melt the seats into oblivion. I only wanted some fairly instant power to pull the car at 8,000 feet of elevation in the same manner as it would at sea level or to just gas the car and start passing whoever is in front of me.
Lastly let me say that if the YH is working properly, granted it won't flow as much air so the hp and torque are a bit less but honestly the YH is still the best compromise between operation and get up and go.
When I did my first blow through system I really did it because the turbo books said it would not work well so I decided to try it and see for myself. I did exactly what Hugh McInnes said to do, reference the fuel pump pressure from the top of the fuel pump to the boost outlet because that would always give the fuel pump the idea that it had the pump pressure plus whatever the boost pressure was, filled the floats so they wouldn't collapse under the pressure, o-ringed the throttle shafts, plugged the choke shafts, left the turbo distributor in and fired it up and it ran, not too badly. I tried a 110 distributor (among others) and found that both it and vac advance worked much better than the turbo distributor and retard and I just drove the car. I never had trouble with any of the system but I gotta tell you Frank, I am a mechanic not an engineer and thusly I can't tell you how the carb knows what to do, it just does it. The only reason I am not using the system today is that when I rebuilt the entire car I just went back to the YH. When Dave Binnie got started on his system a lot of time had passed PLUS Dave has a lot of preserverance to try more things that what I had experimented with. According to Dave he has a really nice working system. Incidentally, my system is still being run daily on a customers car here in Denver, mine just wasn't as refined as Dave has gotten his.
Jim Burkhard then asked:
How did you fill the floats and with what?
Hello Jim: Well I tried two methods, the first was actually used by a fellow named Jim Finley in his attempt which was to unsolder the two halves of the float and fill with a little 'cube' of styrofoam. I was always afraid of simply melting the styro when the re-soldering of the float was done so I tried unsoldering the hole on the side of the float and filling with spray (foam) insulation. Now let me tell you that you can fill one of those little floats mighty quick with a blast from a can of the spray and the float blows up like a balloon in a minute. Finally however I got the hang of shooting very quickly this little dab of foam into the float and it worked. Of course I resoldered the hole in the float and then submerged in gasoline for several days to make sure of no leakage. I probably ruined 20 floats by the time I got two complete.
Now that I have told you this, let me relay what happened several years ago when a fellow pulled into the shop with a turbo on a 140 and he was blowing into all four carbs. He had made a box with four 2 1/4" outlets and had 4 tubes into the top of the carbs and he told me that he had done the system in the late 60s. I asked him what he did to fill the floats and he returned the comment by asking: Why do you need to fill the floats? When I asked him if a float ever collapsed he said he had a bad float once but when he replaced it had never had trouble since. Go figure!!!!!! Of course he could have pulling my leg too, who knows.
Seth Emerson added this on floats:
Or you could do what Don Yenko's carb guy did. He removed the brass floats and replaced them with modified Holley side pivot plastic floats - They modified them to have round bottoms to be less affected by high cornering speeds. They are also solid plastic so no worry about collapse under pressure. They were epoxyed on. - Oh - It takes 8 floats to do a complete 140 four carb set-up. (2 per carb) Only 4 for a 110!
Dan Konkle wrote this on his experience:
When it comes to potential leaks the Rochester carb is not a precision instrument, but putting the teflon bushings in the throttle shafts will fix that problem. You will also want to seal the vent hole at the base of late carbs. Unless you're a clever machinist the chokes will have to go, because the shafts are a very poor fit in the housing. That leaves the hole for the accelerator pump arm. You will lose a little boost pressure through there, but not gasoline.
I limited my boost to 10-12 psi with a simple popoff valve on the intake crossover, and filling the floats with foam was not necessary. I used a stock used fuel pump with a hose connecting the vent in the cover to the crossover. Never lacked for fuel pressure and the pump never failed. I ran 52 or 53 jets and the motor had 95hp heads. Ran great on Amoco 93 without water injection or electronics.
In my experience, about 14-15 psi of boost is all that can be expected from a blow-through setup. In my Spyder's first configuration, without a popoff valve, when that boost level was reached the whole system sort of shut down with some VERY alarming detonation. Whether this was from being overrich or overlean I can't say (I should point out that while most of you guys were studying fizzix I was over in the liberal arts building), but limiting the boost to just below that level works out fine. Twelve pounds of boost is quite fast.
Finally, here are Dave Binnie's comments on his setup:
All modern turbocharged cars are blow-through types, sort of an in- accurate term, but most will understand it. The reason why a draw through needs to be so rich, is because the carb has no way of knowing it is under boost, and so to prevent a disastrous lean condition, they jetted the YH rich, right out of the box. Not to mention the poor throttle response you get from having your carb 2 or more feet from the heads. A blow through system can, because the carbs are part of the boosted condition [talk to the guys at CB Performace about their blow-through VW's-carbureted]. I have a stock 180 with 2 modified Rochesters [reinforced floats, air sealed throttle shafts, milled bowls] and I designed a plenum to blow-through them [a wastegate is a MUST]. The only problem with this system occurred in 1963, with Bill Thomas, when EFI compressor bypass valves did not exist [100% mandatory-makes the whole system stable]. The carbs are the MOST reliable parts of this system. The car drives like a modern EFI car, [believe the tech guide article when it says that the 2304 cam is mild...it is! Glass smooth idle like a 95] gets 26 miles per gallon [until you floor it] full boost [as much as 15psi] in any gear, immediate response, and a high 13 sec 1/4 mile time [My brothers 5.0 Mustang was behind me at 100 MPH]. I would never run a stock configuration again unless I wanted the car stock for Concours. There are a number of other mods that must be performed, but easily worth the extra hassle. I do warn of high boost with not enough octane. This system can also use an intercooler, and no draw-through can. Layman's terms for those who want POWER along with decent mileage, cleaner oil, cooler head temps [never gets over 350 degrees in 85 degree weather]. Lots more to tell to those interested...
When you blow-through a venturi, you also pressurize the float bowl through the vents. The fuel pressure regulator that is indexed to the same spot on the intake plenum that the wastegate is, will allow 3-4psi higher pressure than the boost the manifold is seeing, depending on the initial fuel pressure setting [EFI pump capable of 40 lbs-regulated base at 3-4lbs]. This means that the fuel pressure will be precisely that amount above turbine outlet pressure. So, the float bowl will always be pressurized at this value above boost, even as boost rises. In turn, it will not force the fuel back through the lines under boost, but rather tend to flow an amount equal to the increased air flow through the venturi. With my exhaust gas analyser, I have found the mixture ratio [at my elevation] with .054 jets to remain relatively constant at 12.85:1, until you hit around 14 psi boost above atmospheric. At this point [and the CB people will agree] you will get too close to Lambda, and detonation is problem, obviously. This is where injection will solve the problem, unless you are willing to go with larger jets, [and stay with carbs] which will only give lousy all round mileage and cause the car to be a BIG polluter [back to one of the YH's problems]. With the .054s, it is a nice driving, all around powerhouse. BUT... more is available. Just ask Mike Mann, he has the injection system which could provide the answer. Injection is superior, but even some of the kit builders out there do not have a way to enrich under boost, causing some real problems.
Just a note on using the factory fuel pump and the reference line trick as Bill Thomas did... The fuel pumps these days as you know, are questionable as they are... take it from me, in this blow-through application, mine lasted about a month!! Besides, with an electric pump and a boost sensitive regulator and fuel return line [I run one-5/16] You can somewhat adjust your fuel ratio by raising the initial pressure before boost.
Dave later added this:
To add on the reinforced float thing, I tried filling them etc, but I came up with a super-simple solution that costs almost nothing, and has been working in my car for 5 years. I use very small copper tubing[obtained at hobby stores-about .010 thick] soldered on an angle on either side of the float. No interference, and the tubing acts as a frame preventing collapse. Gary's site has my intercooler setup in his 2001 Convention section on his site. Location of intercooler in picture is due to the fact that it is going to be an air to water unit. I will be installing a cyclone air to water unit over the winter along with T03 turbo.
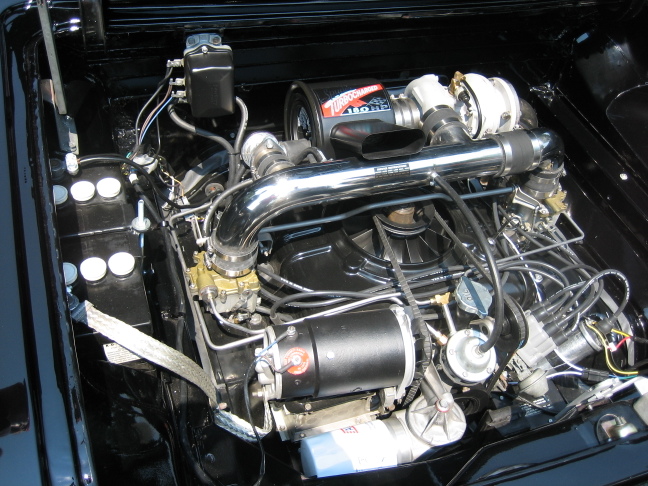
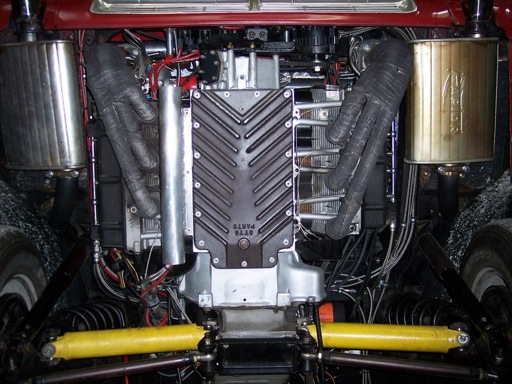
Mel Francis sent me this photo and text of Max Roeder's LM project "Snowball".
"Snowball", as it's dubbed, is a dual-turbo, LM conversion that simply got out of hand and 'snowballed', hence the name. It has excellent construction, is beautifully detailed and presently is turning out around 210 rear-wheel horsepower, which means the engine must dyno by itself, at 240, or so. Its owner admits that it's a bear to drive, as the turbos kick in rather hard, but with further fuel-curve refinement, I'm sure he'll be able to dial-in more driveability.
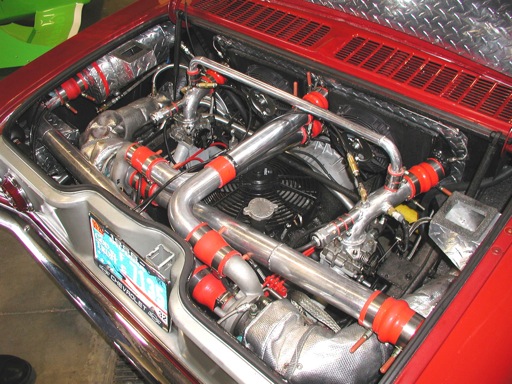
He uses an electric fan. He has had no problems with high temps, says it runs around 300 degrees, but remember that it's still early in the year. The fan isn't thermostatically controlled, he just turns it on once the engine gets up�to temp. There aren't any lower shrouds, so there's less resistance than a stock shroud setup. He also doesn't use the perimeter shrouding, so that's why you can see the clutch housing. It's distributorless and the alternator is on a special bracket, down low, that mounts it with the pulley facing the engine, so its rotation matches the engine.
That diamond-plate is all thin, stamped stock and he's a welder, so the weight of all his stuff is pretty light. Notice the special Y intake manifold welded to the side of each head, just below his EFI throttle bodies. There's an intake scoop up on the rear deck and he's covered the underside of the deck with more aluminum, to guide the air to his air filter cannisters, one on each side. Also, a large round hole in the middle of the aluminum sheet, to supply cool air to the fan below, since the twin intercoolers block the flow out of the rear window plenum somewhat.
The turbos are both water-cooled, so there's a forward radiator in the trunk and he gets all his interior heat from that hot water supply. He has sensors everywhere and admits he might simplify the feedback system, once he has more temp and pressure data accumulated.
 Max added this, including a link to more photos:
The latest revision is to the engine cooling system. I am currently using a Zirgo 3000 cfm, 14" 12 volt fan and four (4) .008" fogging nozzles connected to a Cooling Mist 250 psi water pump. The fan speed will be increased to 16 volts using a variable speed drive and a 12 to 24 volt converter. That should give me about 33% more air moving over the engine. The fogging nozzles were reduced to the .008" from .012" simply because of the volume of water used with the .012's. The engine misting nozzles are controled by a J thermocouple inserted where the original thermister was on the underside of the head. Using a Red Lion brand temperature controler the temp on was moved up to 400 from 375F. Although I haven't seen cylinder head temps above 380F (at the spark plug) I am attempting to get the temps right withought cooking the engine. All cylinders an exhaust temps are monitored using a pair of Air Logic monitors mounted in the center dash. My objective is to find a control process that will give me 350F CHT and 1350 EGT.
Other efforts are being taken to help cooling the engine by creating negative engine bay pressures using some ground effects mounted under and just in front of the engine bay. I will keep you up to date with my efforts and results.
Max Roeder
See more photos of Snowball here.
Some good basic info on water injection can be found in tests done during WWII for aircraft engines.