When reassembling block, use cam lube on all bearing surfaces. Torque case bolts to lOft-lbs and then pound top of case with a rubber mallet to relieve any stresses. Continue to torque case and pound with mallet at 20ft-lbs and 30ft-lbs. (Note: use torque pattern in GM Service manual)
Bore cylinder sleeves to .007 larger than pistons. Watch for porous castings and cracks in cylinder wall.
Use TRW L2206F + .040 Pistons.
Set end gap at .020 on rings.
Install new rod bolts and nuts, then resize large rod end. Polish sides and end of rods, balance end for end within 1 gram, shot peen.
Use Iskenderian anti-pump up lifters. Stock lifters fail because snap ring comes out.
When installing cylinders on block use 2 gaskets under cylinder to get proper piston to head clearance.
Do not exceed 26ft-lb torque on rod bolts.
Cams with more than 300 degrees duration or .480 lift may require flycut pistons for intake valve clearance. At least .090 clearance is needed.
Use all bronze guides and no valve seals.
Check valve spring height. New seats and valves can change height of valve by .100. Shim to stock height.
Use aluminum spring retainers.
Mill head approximately 0.120 inch (will almost hit spark plug hole) CC of combustion chamber will be 47-48cc with a used crushed head gasket in place. Do not forget to mill outer surface of head also.
Be sure to check clearance on:
Milling the head upsets rocker arm geometry. Install elther shorter push rods (CROWER) or install caps on top of Yalve stems (CRANE) equal to head milling.
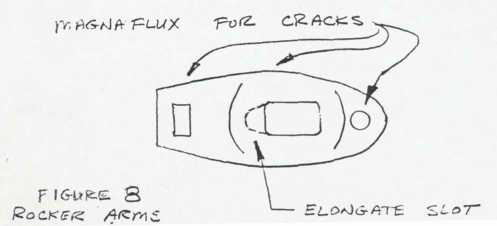
For-high lift cams the slot on bottom of rocker arms must be elongated.
Tuned headers of 1 1/2 O.D. tubing should be used with a primary length of 38 inches. Collect directly into a 9 inch megaphone 1 1/2 I.D. inlet and 2 1/2 I.D. outlet.
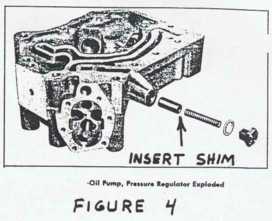
Oil pressure relief spring should be shimmed about .200 inch to increase pressure for auxillary coolers and filters. Place small nuts or washers under spring - see figure 4.
Use the standard oil pump. It is more than adequate especially at racing RPM.
Block oil cooler bypass by plugging hole. Remove oil filter bypass and cut off stock oil filter adapter and plug openings.
Remove stock oil pressure sender unit and plug hole. These units will crack when racing. Install oil temperature and pressure gauges on return line from oil cooler.
Use a remote oil cooler (plate and folded fin type only - not a tube type). Install a full flow filter before the oil cooler. Remote lines should connect to old oil cooler location - not at the old filter (so you can change fan belts quickly). Oil temperature 210 deg F maximum.
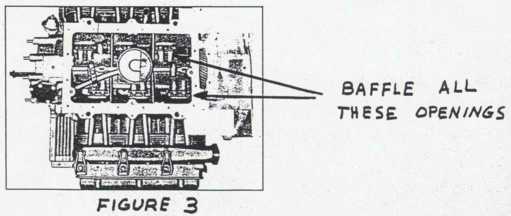
Install an extra breather in the front part of the top cover.
Safety wire oil filter cap and oil dip stick handle down tightly.
Stock valve covers seal much better than aluminum covers and do not affect engine temperature. Use new gaskets everytime cover is removed.
Recommended oil: Quaker State Racing oil 40W.
Use fast advance springs on stock weights. Set initial advance at 18ˇ BTDC. Full advance should be 40 degrees 3000 RPM.
Use Packard 440 wire or equivalent. Install positive attaching spark plug clips that cannot blow off. Use Champion L61Y plugs with .025 - .030 gap.
A stock coil is sufficient and CD ignition is not necessary if system is in proper order.
The 1 1/2 inch carbs are needed to develop power above 5500 RPM. These can be made from stock carbs by boring and sleeving throttle. The jets should be relocated to the rear of the carb. Only one vent tube is required if installed in the position of a stock 1960 carb internal vent duckbill (Figure 5). The float ajustment is critical. We have designed a special racing float which is less critical under hard cornering. The gasket covering the carb bowl should be of the solid type with no holes or cut outs.

For 1 1/2 carbs the manifold must be bored out to 1 1/2 inch also.
The accelerator linkage should have the rubber grommets removed at all connecting points and replaced with solid bushings. Lubricate all carb linkage each race.
Carry an extra fan belt in engine compartment. This can be taped to rear panel so it can be installed quickly.
Before installing top sheet metal cove, on engine, inspect all other sheet metal for a tight flt against cylinders.
Oil temperature should not exceed 210 degrees F (see oil section). Cylinder heads should not exceed 500 deg F on center cylinder (400 deg F on end cylinders)
Frequently Asked Questions. |
Bibliography. |
Mail me! |
Suppliers. |
Home. |